


WP Travel Engine: Navigating Unforgettable Journeys with the Premier Tour Booking Plugin for WordPress
by Akhilesh S (Software Developer) | Updated on March 5, 2024

WP Travel Engine is a powerful tour booking plugin designed for WordPress websites, offering a comprehensive solution for travel agencies, tour operators, and anyone involved in the tourism industry. This plugin seamlessly integrates with your WordPress site, providing a user-friendly interface for managing and selling tours online.
WP Travel Engine is a WordPress plugin that transforms your website into a comprehensive travel booking platform. Not only can you add trips with detailed itineraries, but customers also can enquire and book these trips directly on your website. Trips can be arranged and managed based on destinations, activities, and trip types. This plugin is also a powerful tool for customer management, allowing you to view the number of bookings made by a particular customer and manage all bookings and inquiries from your WordPress dashboard. Additionally, it offers the flexibility to define your payment method.

Here are some of the features of the WP Travel Engine:
Onboard Configurable Tabs & Settings:
You can configure tabs and settings for your trips.
Creating/ Adding a New Trip:
You can create a new trip with a detailed itinerary.
Destinations (Add/View/Modify):
You can add, view, and modify destinations.
Activities (Add/ View/ Modify):
You can add, view, and modify activities.
Trip Type (Add/View/Modify):
You can add, view, and modify trip types.
All Bookings:
You can manage all bookings made by your customers.
Manage Bookings:
You can manage all the bookings made by a particular customer.
All Customers:
You can view and manage all your customers.
All Enquiries:
You can view and manage all enquiries made by your customers.
Coupon Code:
You can define your own coupon code.
Trip Search:
You can search for trips based on destinations, activities, and trip types.
Features
1. Unlimited Travel Packages
There is no limitation on the number of tours you can create and sell. Easily add tour details, gallery, itinerary, regular price, sales price, duration, trip facts, FAQs, and the cost included and excluded.
2. Advanced Trip Search and Filter
Use the existing search filters or create custom filters to let your customers find the matching trip based on the destination, budget, duration, activities, trip types, etc.
3. Smart Travel Booking Process
The trip booking process is smooth, quick, and smart. The price automatically gets adjusted based on the number of people selected. In addition, the booking form only includes the necessary fields, which results in faster booking and more sales!
4. Payment Processing
WP Travel Engine supports a wide range of payment gateways. Your customers can book online, and you can receive payment quickly.
5. Progress Bar
WP Travel Engine comes with a beautiful progress bar. The progress bar visually represents how much progress a guest has made toward booking a tour. Research has shown progress bar to increase booking and sales.
6. Enquiry Form
WP Travel Engine includes an enquiry form on the trip page so that customers can easily find the form, fill it out and contact you. You can now get more enquiries about your travel packages.
7. Booking Email Notification
You can customize the message that your customer receives when they book a trip. Also, every time a traveler books a trip on your website, you too will receive an email notification with all the booking details.
8. Booking Details
The booking information is all saved on your website with all the details of the travelers. You are just a few clicks away whenever you need any booking details or information.
9. Discount Coupon
You can create different coupons to offer discounts to customers and entice them to book.
10. Itinerary Builder
WP Travel Engine has an easy-to-use itinerary builder that lets you create detailed itineraries for your customers.
11. Create More Tabs
There already are four tabs (Overview, Itinerary, Costs and FAQs) on each page. If you need more tabs, easily create them and even change their order!
12. Unlimited Trip Facts
You can create unlimited trips ‘Facts’ such as group size, meals, accommodation, the best time to visit, and so on, and then add them to different trips.
13. Destination Page
You can easily create destination pages. For example, London, USA, and Nepal. So whenever a traveler visits a particular destination page (for example, Nepal), the traveler can see all the trips that belong to that destination.
14. Activities Page
You can create different activities such as hiking, sightseeing tours, mountain biking, skiing, and so on. So when a customer visits your website, they can see the various activities that you offer and the trips associated with them. For example, if customers visit a hiking activity page, they will see all the trips associated with hiking.
15. Trip Type Page
You can categorize the trips according to their types. For example, you can create trip types like dog-friendly, child-friendly, budget travel, nature walks, and weekend trips. So when customers visit the trip type page (for example, dog-friendly), they will see all the dog-friendly trips.
16. Currency
You can also choose the currency in which you want to sell your trip package.
Who can benefit from the WP Travel Engine?
WP Travel Engine plugin is perfect for creating
- Multi-day travel and tour websites
- Single-day or hourly tours website
- Trekking websites
- Camping websites
- Mountaineering websites
- Surfing websites
- City tour websites
- Rafting websites
- Jungle safari websites
- Hiking websites
- Summer holidays websites
- Winter holidays websites
- Wine tours websites
- Cruise websites
- Beach holidays websites
A Step-by-Step Guide to Installing WP Travel Engine Plugin
Are you looking to add a comprehensive travel management system to your WordPress site? WP Travel Engine is here to help! In this guide, we’ll walk you through the simple process of installing the WP Travel Engine plugin on your WordPress site, so you can start managing your travel bookings and tours with ease.
Step 1: Download the Plugin To get started, head over to the WP Travel Engine website or the WordPress Plugin Directory. From there, download the plugin ZIP file to your computer.
Step 2: Upload the Plugin to Your WordPress Site Log in to your WordPress admin dashboard and navigate to the “Plugins” section. Click on “Add New” and then select “Upload Plugin”. Choose the WP Travel Engine ZIP file you downloaded earlier and click “Install Now”.
Step 3: Activate the Plugin Once the plugin is uploaded and installed, click on the “Activate” button to activate WP Travel Engine on your site.
Step 4: Configure Plugin Settings After activation, you may need to configure the plugin settings according to your preferences. This includes setting up payment gateways, currency options, booking settings, and more. You can access the plugin settings from the WP Travel Engine menu in your WordPress admin dashboard.
Step 5: Add Tours and Destinations With WP Travel Engine installed and configured, it’s time to start adding tours and destinations to your site. Use the intuitive interface provided by the plugin to create tour packages, set prices, add descriptions, and upload images.
Step 6: Display Tours on Your Site Once you’ve added your tours and destinations, you’ll want to display them on your website. WP Travel Engine provides various shortcodes and widgets that you can use to showcase your tours, booking forms, and more. Simply add these shortcodes or widgets to your site’s pages or posts to start promoting your travel offerings.
Step 7: Test and Launch Before going live with your travel website, be sure to thoroughly test all the functionality provided by WP Travel Engine. Test the booking process, payment gateways, and any other features to ensure everything is working smoothly. Once you’re satisfied, it’s time to launch your site and start attracting travelers!
Step 8: Keep Your Plugin Updated To ensure optimal performance and security, be sure to keep WP Travel Engine updated to the latest version. Regularly check for updates in the WordPress admin dashboard and install them as they become available.
With WP Travel Engine installed on your WordPress site, you’ll have all the tools you need to create and manage your travel business effectively. Whether you’re a tour operator, a travel agency, or simply looking to share your travel experiences with the world, WP Travel Engine is the perfect solution for you. Happy traveling!
Frequently Asked Queries…!
Query 1: Where do I edit the recipients of this mail?
Response: If you are referring to changing an email address that receives an enquiry from the Trip Enquiry form, please change your Admin email by going to Admin Dashboard > Settings > General and adding your required email under Administration Email Address.
Query 2: The email generated by the trip enquiry form looks quite bad and I would like to try and style it – where/how do I do this?
Response: The email generated by the trip enquiry form in the WP Travel Engine plugin does not currently provide a built-in option to customize the styling of the email.
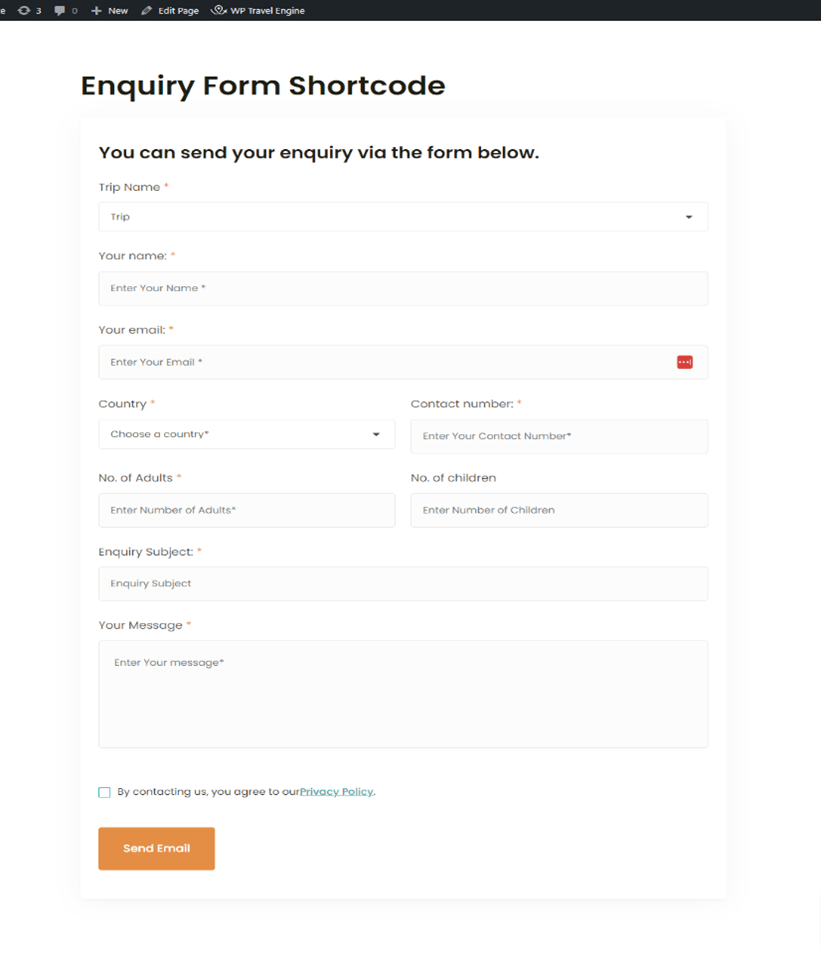
Query 3: How do I display the Trip Enquiry Form?
Response: [WP_TRAVEL_ENGINE_TRIP_ENQUIRY_FORM]
This shortcode allows you to display an Enquiry Form on various pages, posts, trips, and more
Important Short Codes of WP Travel Engine Plugin…!
If you want to display trip packages on various pages, WP Travel Engine Gutenberg Blocks and Elementor widgets are helpful. They are drag-and-drop and require no coding skills. Plus, you can display destinations, trip types, and activities and choose from various layouts.
Here is a list of shortcodes provided by WP Travel Engine.
1. Trip Facts Shortcode
[Trip_Info_Shortcode id='trip_id']2. Display All Trips Shortcode
[Trip_Info_Shortcode id='trip_id']3. Display Selected Trips Shortcode
[wte_trip ids='trip_id1, trip_id2']4. Display Trips By Taxonomy Shortcode
[wte_trip_tax layout='list/grid' postsnumber='Number of trips to display']5. Display trips by Trip Activities
[wte_trip_tax activities='term_id1, termid2']6. Display trips by Trip Destination
[wte_trip_tax destination='term_id1, term_id2']7. Display trips by Trip Type
[wte_trip_map id='trip_id']8. WTE Video Gallery Shortcode
[wte_video_gallery trip_id='trip_id']9. WTE Cart Shortcode
[wp_travel_engine_cart]10. WTE Map Shortcode
[wte_trip_map id='trip_id']11. WTE Trip Code Shortcode
[wte_trip_code id='trip_id']Explore & Learn
Embark on a journey of knowledge and discovery with our curated collection of articles, insights, and updates to foster continuous learning and exploration.